
Your Essential Guide to Makeup Brushes: What to Use and How to Clean Them
Why Do Quality Makeup Brushes Matter for Flawless Application?
Investing in quality makeup brushes is not merely a luxury; it’s a fundamental step towards achieving a professional, polished makeup application. Think of your brushes as an extension of your artistic hand, each designed with a specific purpose to pick up, apply, and blend products with precision and efficiency. Without the right tools, even the most expensive foundation can appear streaky, eyeshadow can look muddy, and blush can apply unevenly.
Here’s why quality brushes are indispensable:
- Superior Product Application: Well-designed brushes pick up the optimal amount of product, distributing it evenly across the skin. For instance, a dense foundation brush can press liquid foundation into the skin for a smooth, airbrushed effect, while fingers might leave an uneven finish or absorb too much product. A study by Sephora found that 85% of customers reported better product payoff and blending when using appropriate brushes compared to alternative application methods.
- Flawless Blending: The hallmark of professional makeup is seamless blending. Quality brushes, especially those designed for blending, have bristles shaped and packed to diffuse harsh lines and marry different shades together beautifully. This is particularly crucial for eyeshadows and contouring, where sharp edges can look unnatural.
- Hygienic Application: Using dedicated brushes reduces direct contact between your hands and your face, minimizing the transfer of oils, bacteria, and dirt. This can be a significant factor in preventing breakouts and maintaining clearer skin, especially for those with sensitive or acne-prone complexions.
- Enhanced Control and Precision: Whether it’s crafting a sharp winged eyeliner or precisely applying concealer to a small blemish, the right brush provides the control needed for intricate details. Fine-tipped brushes allow for meticulous work that larger applicators simply cannot achieve.
- Longevity of Products: Believe it or not, brushes can help your makeup last longer. By applying products thinly and evenly, you prevent excess build-up that might crease or fade quickly. Furthermore, they can help you use less product overall, making your favorite cosmetics last longer.
- Durability and Value: High-quality brushes are built to last. With proper care, they can serve you for many years, making them a worthwhile investment that pays dividends in terms of performance and cost-effectiveness in the long run. Cheap brushes often shed bristles, don’t hold product well, and need frequent replacement, ultimately costing more over time.
Understanding the value of these tools is the first step in building a collection that genuinely enhances your beauty routine. This guide will walk you through the specifics, ensuring every stroke contributes to your best look yet.
What Are the Different Types of Makeup Brushes for Every Application?
Navigating the expansive world of makeup brushes can feel like learning a new language. Each brush is meticulously designed for a specific purpose, from depositing pigment to buffing out edges. To simplify your journey, this comprehensive makeup brush guide breaks down the essential types you’ll encounter, categorized by their primary use.
Face Brushes: Building Your Canvas
The foundation of any makeup look begins with your face. These brushes are crucial for applying primers, foundations, concealers, powders, blush, bronzer, and contour products.
- Foundation Brush:
- Flat Top Kabuki Brush: A dense, flat-topped brush ideal for buffing liquid or cream foundations into the skin for an airbrushed finish. It provides full coverage and minimizes streaks.
- Flat Paddle Foundation Brush: Traditionally used to ‘paint’ foundation onto the face. While it can offer good coverage, it often requires additional blending with another brush or sponge to avoid streaks.
- Stippling Brush: Features two lengths of bristles (often synthetic and natural). The longer bristles pick up product, while the shorter ones push it into the skin, creating a lightweight, dewy finish. Perfect for sheer to medium coverage with liquid or cream products.
Tip: For optimal hygiene, dispense liquid foundation onto the back of your hand or a palette, then pick up product with the brush.
- Concealer Brush:
- Small, Flat Tapered Brush: Ideal for precise application of cream or liquid concealer to blemishes and under-eye areas. The flat shape allows for focused product placement.
- Fluffy Blending Concealer Brush: A small, fluffy dome-shaped brush designed to gently blend concealer, particularly under the eyes, for a seamless finish without tugging delicate skin.
Tip: Use a dabbing or pressing motion rather than swiping to maintain coverage when applying concealer.
- Powder Brush:
- Large, Fluffy Dome Brush: The quintessential powder brush. Its soft, expansive bristles are perfect for applying loose or pressed powder all over the face to set makeup, reduce shine, and blur imperfections.
- Tapered Powder Brush: Slightly smaller and more pointed than a typical powder brush, allowing for more precise application of powder to specific areas like the T-zone, or for baking under the eyes.
Tip: Tap off any excess powder from your brush before applying to avoid a cakey finish.
- Blush Brush:
- Soft, Dome-Shaped Brush: Designed to deposit blush onto the apples of the cheeks and blend it outwards. Look for one that’s not too dense to prevent over-application.
- Angled Blush Brush: The angled shape hugs the cheekbones perfectly, making it excellent for applying blush, contour, or bronzer with precision and definition.
Tip: Smile to find the apples of your cheeks, then apply blush in gentle, circular motions upwards towards your temples.
- Bronzer/Contour Brush:
- Large, Fluffy Angled Brush: Similar to an angled blush brush but often larger. It’s perfect for sweeping bronzer across the high points of the face (forehead, cheekbones, jawline) for a sun-kissed glow.
- Tapered Contour Brush: A smaller, denser brush with a more defined taper, ideal for precise contouring under the cheekbones, along the jawline, and on the sides of the nose.
Tip: When contouring, remember the “3” shape: sweep from the forehead, under the cheekbone, and along the jawline.
- Highlighting Brush:
- Fan Brush: A thin, fanned brush that lightly dusts highlighter onto the high points of the face (cheekbones, bridge of nose, cupid’s bow) for a subtle, diffused glow.
- Tapered Blending Brush (smaller version): A small, fluffy, tapered brush can also be used for a more intense highlight application in targeted areas.
Tip: Apply highlighter sparingly, focusing on areas where light naturally hits your face.
Eye Brushes: Defining Your Gaze
Eye makeup requires precision and a variety of brushes to achieve depth, dimension, and definition. This category is where you’ll likely amass the most brushes.
- Eyeshadow Base Brush:
- Flat Shader Brush: A flat, somewhat dense brush designed to pack eyeshadow onto the lid for maximum color payoff. Perfect for applying shimmer or matte shades evenly.
Tip: Dampen this brush slightly with setting spray for an even more intense metallic or glittery shadow application.
- Eyeshadow Blending Brush:
- Fluffy Tapered Blending Brush: The most crucial eye brush. Its soft, tapered bristles are perfect for blending out harsh lines in the crease and diffusing eyeshadow for a seamless transition between colors. Often comes in various sizes for different eye shapes.
- Smaller Pencil Brush: A firm, pointed brush ideal for precise blending in the outer V, smudging eyeliner, or applying shadow to the lower lash line.
Tip: Use clean blending brushes to buff away any harsh lines after all shadows are applied.
- Crease Brush:
- Domed Crease Brush: Slightly firmer and more pointed than a blending brush, specifically designed to fit into the crease of the eyelid, depositing and blending color to add depth.
Tip: Work with light pressure and build up color gradually in the crease to avoid over-application.
- Eyeliner Brush:
- Angled Eyeliner Brush: A stiff, thin, angled brush perfect for applying gel, cream, or powder eyeliner along the lash line. Also great for filling in eyebrows.
- Fine Point/Detail Eyeliner Brush: An ultra-fine, pointed brush for achieving the sharpest winged eyeliner or creating intricate designs.
Tip: For a softer liner look, use an angled brush with dark eyeshadow pressed into the lash line.
- Brow Brush/Spoolie:
- Angled Brow Brush (often double-ended with a spoolie): The angled side is stiff and thin, perfect for applying brow powders, pomades, or gels with precision. The spoolie (a spiral brush) is used to comb through brow hairs, blend product, and tame unruly strands.
Tip: Always brush through your brows with a spoolie after applying product to soften lines and make them look more natural.
Lip Brushes: Perfecting Your Pout
While often overlooked, a lip brush can significantly enhance the precision and longevity of your lipstick application, especially for bold or dark shades.
- Lip Brush:
- Small, Flat, Tapered Brush: Typically firm and pointed, allowing for meticulous application of lipstick or lip gloss, defining the lip line, and filling in color with extreme precision. Many come with a cap for portability and hygiene.
Tip: Use a lip brush to mix different lipstick shades or apply concealer around the lip line for a crisp, clean edge.
Natural vs. Synthetic Bristles: How to Choose the Right Makeup Brush?
The type of bristles your makeup brush possesses is as crucial as its shape. Different materials interact with makeup products differently, influencing application, blending, and even hygiene. Understanding the distinction between natural and synthetic bristles will empower you to select the right tool for the job.
Natural Bristles
Natural hair brushes are typically made from animal hair, such as goat, squirrel, sable, or pony. Each type has unique characteristics, but generally, natural bristles share common traits:
- Texture: They often have a natural cuticle, which is slightly porous. This texture allows them to pick up and hold powder products exceptionally well.
- Best for: Ideal for powder formulas – eyeshadows, blush, bronzer, and setting powders. The porous nature helps them pick up pigment effectively and distribute it smoothly and evenly for a soft, diffused look.
- Application: They excel at blending and diffusing powdered products seamlessly, making them a favorite for achieving soft-focus, airbrushed finishes.
- Feel: Generally softer and fluffier than synthetic brushes, providing a luxurious feel on the skin.
- Maintenance: Can be more delicate and require specific cleaning methods to prevent damage. They can also take longer to dry. Some people with allergies may react to natural hair.
- Cost: Often more expensive due to the source material and craftsmanship.
Example: A high-quality goat hair powder brush can pick up a significant amount of loose powder and dust it over the face without disturbing liquid foundation underneath, thanks to its soft, flexible bristles and ability to hold fine particles.
Synthetic Bristles
Synthetic brushes are made from man-made materials, most commonly nylon or taklon. Advances in technology have made modern synthetic bristles incredibly soft, durable, and effective.
- Texture: Non-porous and smooth, meaning they don’t absorb products.
- Best for: Liquid, cream, and gel formulas – liquid foundation, cream blush, gel eyeliner, concealer, and liquid lipsticks. Because they don’t absorb product, they allow for maximum product payoff directly onto the skin.
- Application: Offer precise application and can lay down product intensely and smoothly. They are excellent for creating sharp lines and full coverage.
- Feel: Can range from very soft to firm, depending on their intended use. Modern synthetic brushes mimic the softness of natural hair remarkably well.
- Maintenance: Easier to clean and quicker to dry. They are also more durable and less prone to shedding. Hypoallergenic, making them a great choice for sensitive skin or those with animal hair allergies.
- Cost: Generally more affordable than natural hair brushes, offering excellent value.
Example: A dense, synthetic flat-top kabuki brush is perfect for buffing liquid foundation because its non-porous bristles won’t soak up the product, ensuring that all the foundation goes onto your skin, not into the brush.
Making Your Choice
Many professional makeup artists and enthusiasts now favor a mixed approach, utilizing both types of brushes for different products. Some brands even offer “duo-fiber” brushes that combine both natural and synthetic bristles, aiming to capture the best of both worlds. For example, a duo-fiber stippling brush might have synthetic fibers at the base for cream products and natural fibers at the top for a diffused finish.
When building your collection, consider the types of products you use most frequently. If you’re a fan of liquid foundations and cream blushes, prioritize synthetic brushes. If powder eyeshadows and setting powders are your daily go-to, invest in some good quality natural hair brushes. For ethical and vegan considerations, synthetic brushes are the clear choice, and their performance has improved so dramatically that they are often indistinguishable in quality from their natural counterparts for many applications.
How Can You Master Advanced Makeup Brush Application Techniques?

Having the right brushes is only half the battle; knowing how to wield them effectively is where true artistry begins. Beyond the basic application techniques, incorporating a few advanced tips can elevate your makeup skills and ensure your brushes perform at their peak potential.
1. Grip for Control and Lightness
Where you hold your brush significantly impacts the pressure and control you have:
- For precision and intensity: Hold the brush closer to the ferrule (the metal part connecting the bristles to the handle). This gives you maximum control and allows for more pressure, ideal for detailed work like eyeliner or packing on eyeshadow.
- For blending and softness: Hold the brush further back on the handle. This provides less pressure and allows for lighter, more diffused strokes, perfect for blending out harsh lines, applying blush softly, or contouring with a natural touch. Think of it like a painter holding their brush further back for broad strokes.
2. Layering and Building Intensity
Instead of applying a large amount of product all at once, which can lead to a heavy or patchy look, build your makeup in thin layers:
- Start small: Always pick up a small amount of product with your brush. You can always add more, but it’s much harder to take away.
- Tap off excess: For powder products, gently tap your brush against the back of your hand or a tissue to remove any excess before applying. This prevents powder fallout and ensures an even application.
- Buff and blend: After each layer, use clean blending brushes (especially for eyeshadow) to diffuse the edges before adding the next layer. This creates a seamless transition and avoids a muddy appearance.
3. Understanding Brush Movement
Different brush movements yield different results:
- Stippling/Dabbing: Pressing the brush onto the skin repeatedly. Excellent for building coverage with liquid or cream products (like foundation or concealer) without streaks.
- Buffing: Small, circular motions. Ideal for blending foundation, powder, or bronzer into the skin for a smooth, airbrushed finish.
- Sweeping: Long, smooth strokes. Best for dusting on setting powder or applying blush across the cheekbones.
- Wiping/Patting: For eyeshadow, gently patting color onto the lid provides maximum pigment payoff. Wiping motions are used for blending.
Real-world example: When applying concealer under the eyes, instead of swiping (which can move the product around and reduce coverage), use a small, fluffy concealer brush to gently dab and press the product into the skin, then softly buff the edges for a natural finish.
4. Utilize Multi-Purpose Brushes (Wisely)
While specific brushes are designed for specific tasks, some brushes can be versatile, especially for beginners or when traveling:
- A clean fluffy eyeshadow blending brush can double as a precise highlighter brush.
- An angled brow brush can also serve as an eyeliner brush for powder or gel liner.
- A small, tapered face brush might work for both setting powder under the eyes and applying a pop of blush.
Caution: Avoid using the same brush for different product types (e.g., liquid foundation and powder blush) without cleaning it in between, as this can transfer products and impact performance or hygiene.
5. The Power of a Clean Brush
As we’ll discuss further, clean brushes are non-negotiable. Not only do they prevent bacteria buildup, but they also perform better. A brush loaded with old product won’t pick up new product efficiently or blend smoothly.
Actionable tip: Keep a quick-dry brush cleaner spray handy for daily spot cleaning, especially for eye brushes, so they are ready for your next application without cross-contamination of colors.
6. Know Your Angles for Specific Features
- Nose Contour: Use a small, fluffy blending brush or a pencil brush and create two straight lines down the sides of your nose, then blend outwards for a sculpted look.
- Inner Corner Highlight: Use a tiny detail brush or the tip of a pencil brush to apply a bright, shimmery shadow to the inner corner of your eye to open up your gaze.
- Cupid’s Bow: A small lip brush or even the tip of a highlighting brush can precisely place highlighter on your cupid’s bow for a fuller-looking pout.
By consciously thinking about your grip, application method, and the specific movement of your brushes, you’ll gain greater control over your makeup and achieve truly professional-looking results. Practice makes perfect, and with these tips, your makeup brush guide journey will be much more rewarding.
How to Clean Makeup Brushes: A Step-by-Step Guide
Neglecting to clean your makeup brushes is a common pitfall that can lead to a host of problems, from uneven makeup application to skin irritation and breakouts due to bacterial accumulation. Think of your brushes as sponges for makeup, oils, dead skin cells, and bacteria; without regular washing, they become breeding grounds for unwanted guests. This vital section of our makeup brush guide provides detailed instructions on how to keep your tools pristine, ensuring both hygienic application and extending their lifespan.
Why is Regular Brush Cleaning So Important?
- Prevents Bacteria Buildup: Brushes accumulate bacteria from your skin, makeup products, and the environment. Uncleaned brushes can harbor staph, strep, E. coli, and even fungal infections, which can then be transferred back to your skin, leading to acne, irritation, or worse.
- Improves Makeup Application: Clean bristles pick up and deposit product more efficiently and evenly. Old makeup buildup can cause streaks, patchy application, and dull color payoff.
- Extends Brush Lifespan: Regular cleaning prevents product buildup from hardening and damaging the bristles. It keeps them soft, flexible, and in their original shape, protecting your investment.
- Reduces Cross-Contamination: Especially important for eye brushes, cleaning prevents mixing of different eyeshadow colors, ensuring true-to-pan color application.
- Maintains Skin Health: By reducing the transfer of bacteria and old product, clean brushes contribute to clearer, healthier skin.
How Often Should You Clean Your Brushes?
- Face Brushes (Foundation, Concealer, Powder, Blush, Bronzer): Once a week, ideally. These brushes come into contact with larger areas of your face and often with liquid/cream products, making them prone to significant buildup.
- Eye Brushes (Eyeshadow, Liner, Brow): After every 1-3 uses. Given the sensitivity of the eye area and the frequent color changes, more frequent cleaning or spot cleaning is highly recommended.
- Lip Brushes: After every use, especially if you’re dipping into different lip products.
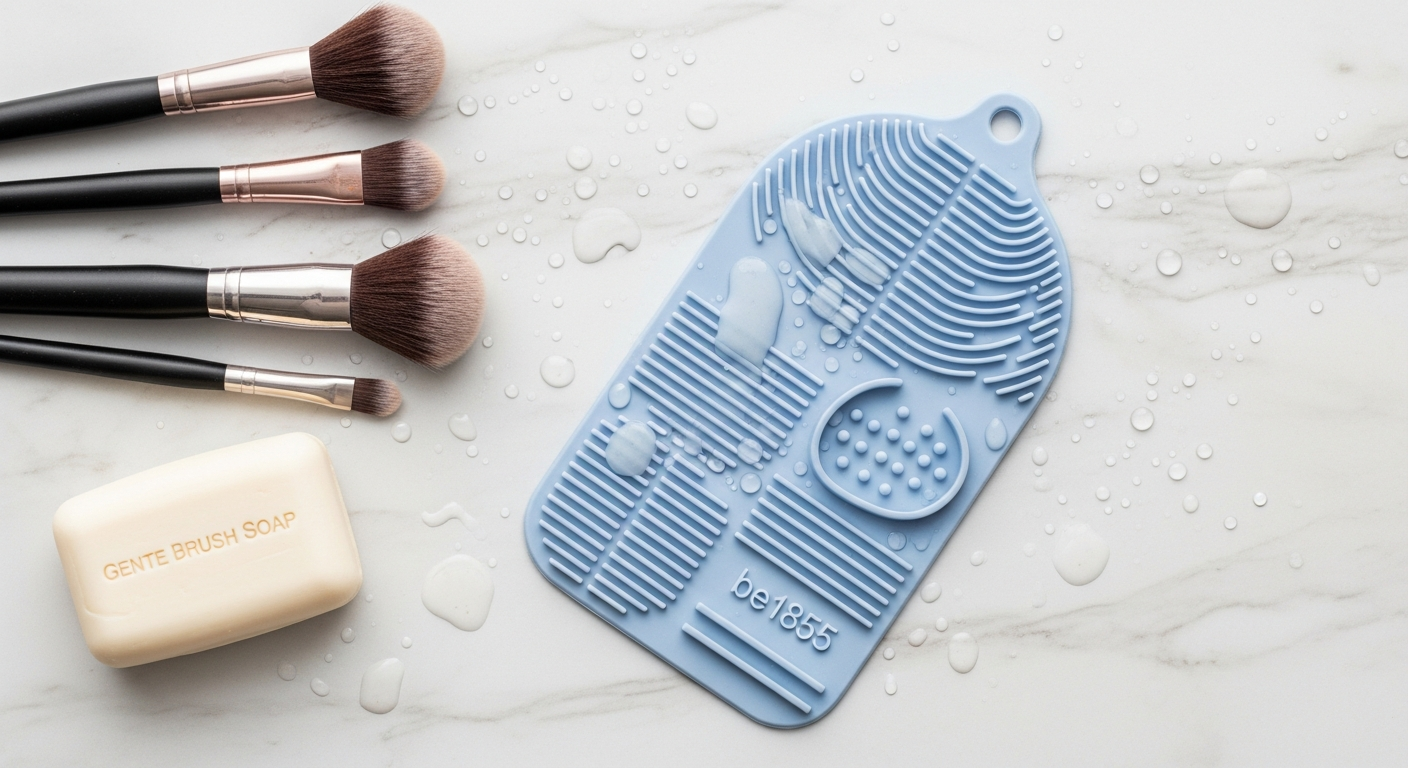
Deep Cleaning Your Makeup Brushes (Weekly/Bi-Weekly)
This method uses water and a cleanser to thoroughly clean and disinfect your brushes.
- Gather Your Supplies:
- Gentle soap or brush cleanser: Baby shampoo, mild dish soap (like Dawn), or a specialized brush cleanser.
- Lukewarm water.
- A cleaning mat or textured silicone surface (optional, but highly recommended for efficiency).
- Clean towel.
- Wet the Bristles: Hold your brush with the bristles facing downwards under lukewarm running water. Avoid getting water into the ferrule (the metal part) as this can loosen the glue and cause bristles to shed.
- Apply Cleanser: Pour a small amount of your chosen cleanser onto your hand, a cleaning mat, or directly onto the wet bristles.
- Lather and Swirl: Gently swirl the brush bristles onto your palm or the textured cleaning mat. You’ll see makeup residue start to come off. Continue swirling until the lather is clean. If using a brush egg or mat, the textures help to work the cleanser deep into the bristles and dislodge makeup.
- Rinse Thoroughly: Again, hold the brush bristles-down under lukewarm running water, squeezing gently to remove all traces of soap. Keep rinsing until the water runs clear and there’s no more suds. Remember to avoid the ferrule.
- Squeeze Out Excess Water: Gently squeeze the excess water from the bristles with your fingers, reshaping the brush head back to its original form.
- Air Dry: Lay the brushes flat on a clean, dry towel, or use a brush drying rack (bristles-down) to allow them to air dry completely. Never dry brushes upright with bristles facing up, as water can seep into the ferrule and damage the brush. Allow 6-12 hours for brushes to fully dry, depending on density.
Spot Cleaning (Daily/After Each Use for Eye Brushes)
Spot cleaning is a quick way to sanitize and remove surface makeup, especially useful for eye brushes between uses or when you need a specific color but the brush is already loaded with another.
- Spray or Dip: Spray a specialized quick-dry brush cleaner directly onto the bristles of the brush, or dip the brush into a small amount of liquid brush cleaner.
- Wipe Clean: Gently swirl or wipe the brush bristles onto a clean paper towel or microfiber cloth. You’ll see the makeup transfer onto the towel.
- Air Dry: Allow the brush to air dry for a few moments. Most quick-dry cleaners evaporate rapidly, leaving your brush ready to use almost immediately.
Tip for Synthetic Bristles: Synthetic brushes are more robust and can generally handle various cleansers, including mild dish soap, very well. They also dry faster.
By integrating these cleaning rituals into your beauty routine, you’ll not only prolong the life of your valuable tools but also ensure a healthier, more flawless makeup application every time.
How to Extend the Life of Your Makeup Brushes: Storage and Care Best Practices?
Proper storage and diligent care are just as crucial as cleaning when it comes to preserving the integrity and performance of your makeup brushes. Mishandling or improper storage can lead to bent bristles, weakened ferrules, and ultimately, a shortened lifespan for your beloved tools. Protect your investment with these essential best practices.
1. Optimal Storage Solutions
The way you store your brushes directly impacts their shape and cleanliness.
- Upright in Holders: For brushes you use daily, store them upright in a cup or dedicated brush holder with the bristles facing up. This prevents bristles from getting crushed or bent. Choose a holder that allows for some air circulation and isn’t too cramped. Glass jars, acrylic organizers, or even custom brush pots work well.
- Actionable Tip: Place larger, denser brushes towards the back and smaller, more delicate ones at the front to avoid crushing. You can also fill the bottom of the holder with coffee beans, rice, or decorative beads to keep brushes separated and standing perfectly straight.
- Flat in Drawers or Rolls: For brushes used less frequently, or for travel, consider storing them flat in a drawer organizer or a brush roll/case. This protects the bristles from dust and potential damage.
- Actionable Tip: Ensure the drawer is clean and dry. Brush rolls are excellent for travel as they keep bristles protected and organized, preventing them from getting squashed in your luggage.
- Avoid Humid Environments: Never store brushes in areas prone to excessive humidity, like directly next to a shower, as this can foster bacterial growth and weaken brush glue over time.
2. Handle with Care
Your brushes are delicate instruments; treat them as such.
- Gentle Use: When applying makeup, use gentle pressure. Aggressive scrubbing or pressing too hard can splay the bristles and shorten the brush’s life.
- Avoid Touching Bristles Unnecessarily: Try not to handle the bristles with unwashed hands, as oils and dirt can transfer, necessitating more frequent cleaning.
- Don’t Share Brushes: Sharing brushes, even with close friends or family, is a major hygiene no-no. It can transfer bacteria and lead to skin issues. Professional makeup artists rigorously sanitize brushes between clients for this very reason.
3. Periodic Deep Conditioning (for Natural Bristles)
Just like the hair on your head, natural hair brushes can benefit from a conditioner to maintain their softness and flexibility.
- How To: After deep cleaning natural hair brushes, apply a tiny amount of hair conditioner (or a specialized brush conditioner) to the bristles. Rinse thoroughly and reshape before drying. This helps prevent them from becoming brittle or rough over time. Do this every few months or as needed.
4. Watch for Signs of Wear and Tear
Even with the best care, brushes won’t last forever. Recognize the signs it might be time to replace a brush:
- Excessive Shedding: A few loose bristles here and there are normal, but if your brush is consistently shedding a significant number of hairs with every use or wash, the ferrule might be loose, or the quality has deteriorated.
- Bristles Splaying or Losing Shape: If the brush head no longer holds its original shape, or the bristles are splayed and difficult to reshape, it won’t apply makeup effectively.
- Persistent Odor: If a brush retains a foul odor even after a thorough cleaning, it might be harboring stubborn bacteria or mildew and should be replaced.
By integrating these storage and care habits into your routine, you’ll ensure your makeup brushes remain effective, hygienic, and a pleasure to use for years to come, truly making them a lasting part of your beauty arsenal.
Conclusion: How to Master Your Tools and Your Look
Embarking on the journey to understand and master your makeup brushes is a transformative step for any beauty enthusiast. From the foundational face brushes that create your canvas to the intricate eye tools that define your gaze, and even the often-overlooked lip brushes that perfect your pout, each tool plays a pivotal role in achieving a truly polished and professional makeup look. We’ve explored the critical distinctions between natural and synthetic bristles, delved into advanced application techniques, and, crucially, provided a comprehensive guide on how to clean and care for your precious collection.
Remember, your makeup brushes are an investment in your beauty routine and, more importantly, in the health of your skin. Regular cleaning and proper storage aren’t just about preserving your tools; they’re about ensuring hygienic application and optimizing performance with every stroke. By applying the knowledge from this ultimate makeup brush guide, you’re not just buying tools – you’re learning how to unlock your full creative potential.
Now that you’re equipped with this expert knowledge, it’s time to put it into practice. Take stock of your current brush collection, identify any gaps, and consider upgrading or adding the essential tools we’ve discussed. Commit to a regular cleaning schedule, and observe the remarkable difference it makes in your makeup application and skin health. Your journey to flawless makeup starts with perfectly maintained brushes. Ready to transform your routine? Explore the latest brush collections and cleaning solutions available, and continue to refine your artistry!
Frequently Asked Questions